
How to Encapsulate a Crawl Space Cost-Effectively
/My crawl space was fully enclosed for a fraction of the cost charged by so-called encapsulation experts. Exterior Walls and rim joists above them are insulated with closed cell spray foam, floor is covered with plastic which is sealed against the walls, underfloor insulation is removed, and dehumidifiers are in place.
Some companies specializing in encapsulation use scare tactics and advertising to sell their premium-priced approaches ranging from $10,000 to $20,000. I found a much cheaper approach to encapsulation - about $3000 using existing plastic sheeting and some of my own labor.
Check out the discoloration on the vertical floor joists above. That’s what the inspector called “past evidence of microbial growth”, aka mold. It was all dead, but I sprayed it all again with bleach just to be sure.
September 2021 Update: Am having the house renovated. The floor boards were rotten, so we had them replaced, as well as several floor joists. We assume this was from years of moist crawl space before I encapsulated it. The renovation gave us the opportunity to have the builder pour 3” of concrete into the entire crawl space. We are also replacing the inexpensive GE dehumidifiers with a professional unit that will drain into one of the crawl’s drain pipes, or into the sump (newly added). All of this should be a permanent solution to our issue, but obviously costs a lot more than the original fix did. The good news? My original fix worked, at very low cost, and the basic elements of the encapsulation (spray foam insulation on the walls, sealing off all vents, removal of the pink under-floor insulation) remain in place (so were not wasted effort and expense).
December 2019 Update: Just finished my second warm season with the dehumidifiers still going strong. Set them at 45% and monitored the system frequently with my Abode sensor - and the crawl never went above 45% RH all summer. I’m attaching my Spring and Fall checklist on connecting/disconnecting the dehumidifiers at the bottom of the article in case anyone finds it useful. Planning a small addition this year and may at that time investigate a professional unit, but for now these have done well.
December 2018: This winter, I bought an older cottage with a crawl space. There were air fresheners plugged in when I viewed the place, so I suspected an odor problem right off the bat. Since everything else looked great, we went ahead with the offer and inspection. In the inspection report, some "evidence if prior microbial growth", aka mold, was noted in the crawl space. Also, they informed me that some of the underfloor fiberglass insulation had fallen down onto the ground, and that the viscous barrier (plastic on the ground) was not firmly attached to the walls and could let moisture through from the ground below. They recommended sealing the crawl space and installing a dehumidifier or two.
I immediately installed an Abode wifi-alarm system (no monthly fee) and placed a temperature/humidity monitor in the crawl space so I could keep an eye on the humidity. All winter long, it stayed in the 40-50% range, but when spring came, I started seeing the numbers climb to 70% on rainy days. Time to fix it before mold sets in!
I called in a big encapsulation company based in Michigan. They had a bunch of fancy marketing names for their proprietary products that would go on the floor, wall, and in the rim joists, making it hard to understand their quote . . . which I think was the point. For an 1800 sq ft crawl space, they quoted me $21,000 to encapsulate the crawl space. If I was willing to make a few compromises and "sign today", they could bring it down to $16,600.
Time to call someone else. I brought in a waterproofing company for a similar quote. They were more reasonable, but it was still more than $10k, and that included Reflectix foil on the walls instead of real insulation with a guaranteed R-factor. I decided to keep studying the issue, using the information they had provided me plus a number of online resources.
The job ended up costing me about $3,000 all-in, using the existing two layers of plastic on the floor. If you don't have existing plastic down, it would, of course, cost more. My dehumidifiers are set to 45%, and all summer long, the humidity has been somewhere between 41% and 45%. My musty odors are gone, however there is a lingering smell from the foam wall insulation that takes a while to go away. I see some effect on the electric bill from the dehumidifiers, but it appears pretty minimal and I hope it to be offset by some energy savings from a better-insulated crawl space.
SUMMARY
With 1,800 square feet of crawl space to condition, and fairly poor air flow due to 3 interior walls, I decided to install two dehumidifiers, even though one would technically be enough. There were several key features to shop for: overall capacity (70 pints/day in my case), built-in pump to empty the water tank, defrost circuit, and energy star rating (for power company rebate),
I'll explain some of the logic and theory further on, but here's the bottom line:
I installed A temperature/humidity monitor in the center of the crawl space (see white box at top center of photo). Mine was from Abode Home Security systems, which has no monthly monitoring fee.
Contacted a local insulation company to remove the existing pink fiberglass underfloor insulation, and to spray foam insulation on the walls and rim joists. This included spraying foam onto the edges of the existing plastic vapor barrier on the floor, to create a moisture-tight seal. They weren’t crazy about doing the insulation removal, but agreed to do it because it was a slow time of year for them.
Bought 2 70-pint GE dehumidifiers at Home Depot for $275 each. My Electric company gave me a $75 rebate on each since they are Energy-Star certified, so the net cost was about $450 or so including tax. These dehumidifiers have a defrost circuit (mandatory) and a pump that will automatically send the collected water outside of your crawl space up to 16 feet.
Installed a wireless temperature/humidity sensor in the crawl space.
I put in the following labor myself:
Sprayed bleach on all rim joists where evidence of prior mold existed - to make sure it was dead.
Dragged the 2 dehumidifiers down and routed the pump discharge hoses out of the crawl space. Put one dehumidifier at each end of the crawl space, and a snail-type fan in the center to keep air circulating.
Had to install a second electrical outlet in the crawl space using an existing junction box. This was so that the 2nd dehumidifier could be on a separate circuit. Each dehumidifier draws 7.6 amps max, so can pretty quickly blow a 15 amp circuit.
Wasted work - closed up about 12 vents in the crawl space using pieces of foam insulation board and spray foam gap filler. Would have just had them sealed with spray foam if I had known the solution at the time.
That's it! Read on if you think this might work for you and to see what I learned.
WHAT I LEARNED
Like any industry, the encapsulation business has some bad players in it. I encountered a couple of them. The salesmen used hard sales tactics, such as offering me a discount only if I signed immediately. Other clues were when they lied about what the humidity was actually at (I have a remote humidity sensor in the crawl), and what it needs to be at, or told me that thin reflectix foil insulation was as good as foam board with a certified R-Factor. That said, there are good companies out there as well. If you choose to go with a professional encapsulation company, do your homework and find the most reputable players.
You want your crawl space under 60% relative humidity (RH) to prevent mold growth. Some say ideally at 45%, but keep an eye on your wood floors for possible separation between the boards. Mine are set at 45% with no issues.
In the old days, crawl spaces were "open". They had vents to let air flow in, thinking that would keep the humidity down. The walls were not insulated, but instead they put insulation under the floorboards. There was a plastic sheet (vapor barrier) on the floor to reduce moisture. Basically, your crawl space was like the outdoors. This is still acceptable code today, but everyone recommends the newer encapsulation approach.
Encapsulation is the newer approach. You remove all underfloor insulation and instead insulate the crawl space walls and the rim joists above them. You seal all vent openings. A quality vapor barrier is laid on the floor, and ideally a plastic layer that has raised dimples in it to allow any surface water to run to a sump. You add a sump pump, and install an industrial duty dehumidifier. Basically, the crawl space becomes like a basement, except the heating/cooling is not vented from your furnace, but strictly relies on radiant heat/cooling though the floor.
With encapsulation, you have some significant advantages:
You can control humidity. With an open crawl space, putting a dehumidifier is useless because you are basically trying to dehumidify the entire outdoors due to open air flow , as well as moisture creep through cinder block walls. Also, the pink underfloor insulation in an open crawl space holds moisture.
It is better insulated, reducing heating/cooling bills.
It smells better. After removing the nasty old pink underfloor insulation from my crawl space, the musky mildew smell inside the house improved immediately. That's because the pink stuff holds water, odors, and lots of dead mice and mouse poop.
It should eliminate or dramatically reduce the ability of critters like spiders and mice to live in your crawl space. Spiders require moisture to survive.
In colder climates, the dehumidifiers do need to be shut down before winter, and turned back on in the spring. Otherwise, the dehumidifier coils will freeze up when the crawl space gets around 42F or below. Also, the water discharge tubes running outside the crawl space can freeze closed if there is any standing water in them (from the dehumidifier, or just from melting snow).
STEP 1
INSPECT AND PREPARE YOUR CRAWL SPACE.
Get a full-body protective suit, a face mask respirator rated for mold spores, some protective glasses, and some gloves. Go down in the crawl space with a flashlight and understand:
Full body suit, respirator, goggles, and gloves are available at most hardware stores.
Does my hair look OK?
1A) Understand the layout of the walls and doors.
In my case, the crawl space was split into 4 sections, some with two openings to crawl through, and one with only a single opening - making air flow throughout the crawl space difficult. I decided I needed a circulation fan placed in that center opening, with a humidity monitor nearby. I also have access doors at both ends, which means I could put a dehumidifier at both ends and not have to crawl through the entire space to get to one of them.
Here’s one entrance to my crawl space. This end has wall insulation, but you can see the open vent. At first, I sealed it off by cutting more foam board to fit, and sealed it in place using that expanding foam you find at the hardware store. Since I later opted for foam wall insulation throughout, I could have saved myself several hours of work by just having the insulation company spray foam over the vents. Also note that I had an existing light socket with a 3-prong outlet, which I used to power one dehumidifier plus a snail-type fan.
Here’s the north end of my crawl space, which is the old portion. The metal access door is tiny, the walls are a foot lower, the insulation is ratty and falling down, and there are big gaps in the wall where the sewage pipes exit to the septic field.
My crawl space has 3 interior walls dividing it into 4 sections. The center wall has only 1 opening, whereas the other two walls have two openings each. That single opening in the center wall really cuts down on the ability to get air circulating, so that’s where I decided to placed a snail fan.
I had an existing light by the south entrance to my crawl space, the kind with 3-prong plugs on the light socket. I put them to good use for my fan and A/C unit, but I occasionally blow a fuse in the kitchen. Next year I will put in a dedicated circuit for the dehumidifier during some other planned renovation.
1B) Find existing electrical outlets or circuit boxes.
This affects lighting, and connections for your dehumidifiers and fan. If your crawl space is sizable (mine was 1800 sq ft), you may want to put two dehumidifiers in, in which case you will need two places to plug them in. They must be plugged into separate circuits, ideally not the same ones where you have other high-draw appliances on (e.g. microwaves, coffee makers, sump pump, septic pump, etc.). Determine your needs, then either install the outlets yourself, as I did, or hire an electrician for the job.
1C) Inspect the condition of existing under-floor insulation.
If some of it has fallen down onto the crawl space floor, that’s a sign that moisture has built up within it, making it heavier and more likely to fall. Peel back the insulation in a number of places and look at the sides of the floor joists, and also at the bottom of your first floor. Mice tend to make nests in this stuff, so you’re likely to find years of accumulated mouse turds and a few dried-up mice in your explorations. Enjoy:)
If your under-floor insulation is drooping or falling down, that’s a sign that there has been excessive humidity/moisture in the past. It stays in the insulation, making it heavier and more prone to falling out of place. It also holds that musty/moldy odor. It has to be removed as part of the encapsulation process.
1D) Check for existing mold, or evidence of past mold.
For this, you’ll need to move aside some of your under-floor insulation (mine was pink) since that’s where a lot of the mold grows - on the sides of the floor joists (vertical 2x6 or 2x8 boards under your house floor). If it’s existing mold, you’ll need to spray it with a mold killer product or bleach. If it’s just stains from past mold, it’s not really hurting anything but there is a product out there which is kind of a mold “shell” that seals it from creating mold again. In my case, I had some evidence of “old mold” stains, and just sprayed them with bleach to be sure it was all dead. I wasn’t worried about mold growth, since the entire crawl space would be sealed and dry when I am done.

In some areas, the joists were splotched with white. I assumed this was also some sort of old mold, so I sprayed it with bleach or mold killer as well.
This was the worst part of my crawl space. Lots of old mold staIns visible. Underfloor insulation ratty and fallen or hanging down in some places.
1E) See if there is an existing plastic barrier on the floor.
Is there one? If so, is it covering the floor completely without rips and tears? Are the seams taped together as they should be? Is it taped to the walls, or just laying against it? Is it pretty thick, or likely to rip every time you crawl over it? You want the plastic to be taped together well along all seams, and either taped or glued to the walls (both exterior walls and interior support walls), pylons, and any pipes coming out of the ground so that moisture cannot enter the crawl space through it. Taping the plastic to the walls is a lot of work, so I had it done by the insulation company. All they did was spray a little extra foam at the bottom of the walls to make sure it sealed the plastic to the walls. Very little extra work for them, and a lot less work for me.
Here’s the newer part of my crawl space before the project. Floor insulation falling down, but the walls were insulated with foam board. There were 2 layers of plastic on the ground, and even though there was some moisture underneath them, sealing the plastic well would keep that moisture out of the crawl space.
1F) Look for water seepage or leaks.
In my case, I had water seepage under the plastic sheeting at one end of the house, and leaks from bathroom plumbing at both ends of the house. Fix the leaks. I ignored the water seepage because I intended to seal the plastic floor sheeting to the walls with spray foam, effectively keeping the water from adding to the moisture level in the crawl space. I did investigate it separately, however, and found some drainage issues in the yard that I am addressing.
STEP 2
INSTALL A HUMIDITY MONITOR OR TWO IN THE CRAWL SPACE. I can’t say enough about how nice it is to have a wireless temperature and humidity monitor inside my crawl space. At any time, I can pull up the app (Abode Security Systems, in my case) and see the current temperature and humidity. This gives you peace of mind that your encapsulation project worked, and that the dehumidifiers are continuing to function properly. As I mentioned above, within days of finishing the project, my humidity levels dropped from the 60 and 70% levels down to 45%, and stayed there every single day. You can also understand crawl space temperatures vs. your first floor indoor temperatures. Mine tend to run 5 to 10 degrees F colder than the inside temperature in the winter. So, I keep the first floor somewhere around 50F and the crawl space stays at 42F or above - plenty warm to keep my water pipes from freezing.
i PLACED A TEMPERATURE/HUMIDITY SENSOR ON A JOIST IN ABOUT THE MIDDLE OF MY CRAWL SPACE. iT’S THE WHITE BOX AT THE TOP OF THIS PHOTO.

Here’s a screenshot of the Abode Systems app showing the temperature and relative humidity readings from my crawl space sensor.
STEP 3
REMOVE EXISTING UNDERFLOOR INSULATION
You need to remove all of this stuff, which is a big job. I outsourced mine to the local insulation company who sprayed foam on the walls. We ended up with 47 huge contractor-sized bags of stinky pink insulation, each of which had to be shoved out tiny crawl space access doors and then hauled away. I was glad to pay for this part of the job.
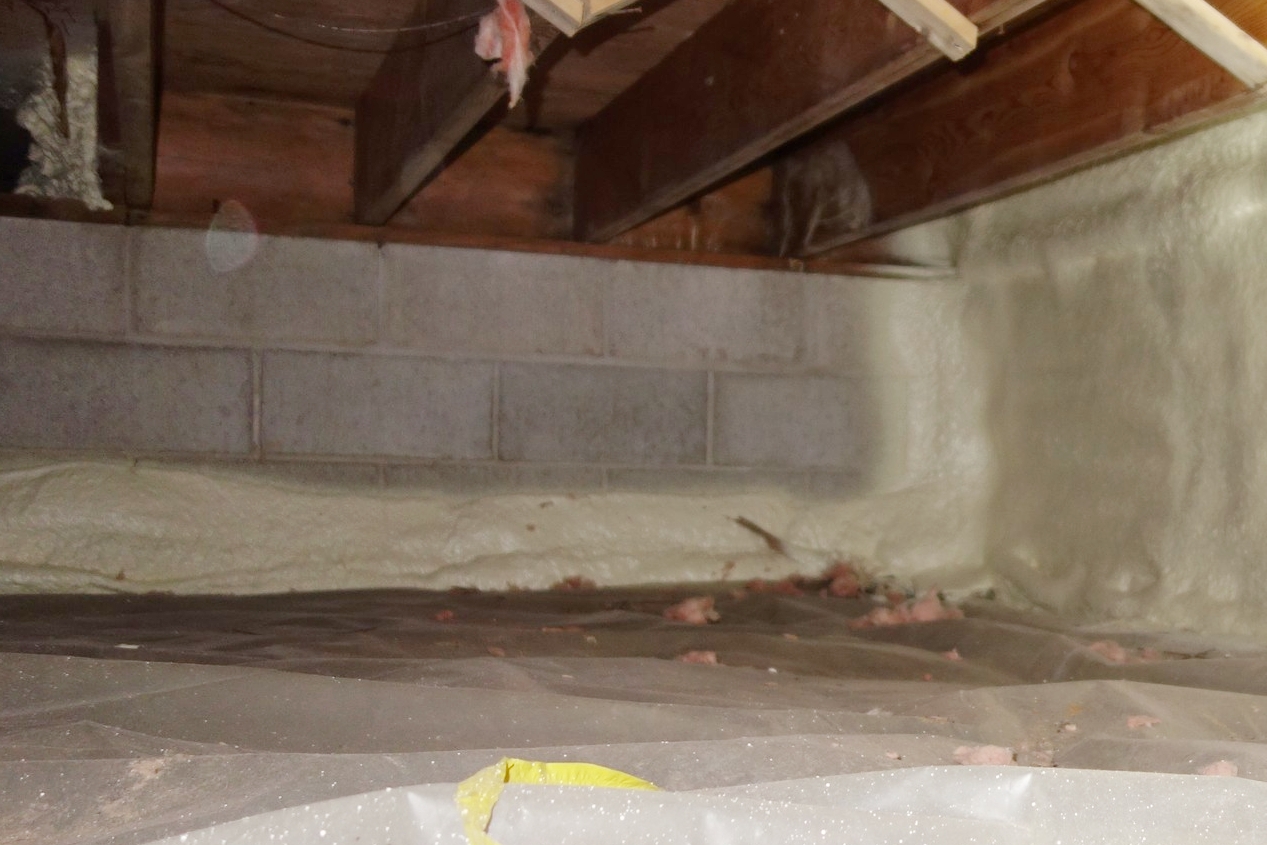
Removing the under-floor insulation makes a world of difference in appearance and smell. You can see some evidence of past mold growth on the vertical floor joists (upper right), but it is dead and won’t be coming back at 45% constant relative humidity.
This photo was taken in January, before the project began. You can see that the temperature in the crawl space is in the 30’s, a little too close for comfort to 32F and freezing water pipes. With under-floor insulation in place, your crawl space does not get as much radiant heat from the heated house above. Once you remove it, the temperature in the crawl space gets much closer to the temperature in your home. The benefit? You can lower your home temperature further while away without risk of freezing pipes.
STEP 4
ADD SPRAY FOAM WALL INSULATION.
You need to fully insulate the side, exterior walls of your crawl space since you removed all underfloor insulation. This include the vulnerable rim joist area at the top of each concrete or cinder block wall, which is the first 12” or so of wood walls that are above the concrete but below the floor. Your exterior vents are located here, and they must be permanently sealed with foam. Also have the foam company spray along the bottom of each wall to create a seal between the plastic on the floor and the wall. Interior support walls do not have to be insulated with foam, since they are part of the conditioned space. However, you do need to spray the bottoms to create a seal between the plastic flooring and the interior wall. Likewise, have them spray/seal anywhere anything else comes out of the floor, such as a concrete support pylon, or a pipe.
About a quarter of my crawl space had existing foam board insulation in place on the walls. For that area, I just had the insulation company seal the plastic flooring to the bottom of the foam, and insulate the rim joists above the wall.
Interior crawl space walls such as the one on the left side of this picture do not need to be fully insulated. The insulation company simply sprayed the bottom to provide a seal between the plastic flooring and the interior wall.
While I was down in the crawl space, I insulated any portions of my water pipes that were not already wrapped, including all hot water piping. This cuts down on condensation/moisture in the crawl space, and might help a tiny bit with water heater bills. With self-adhesive foam wrap, it was quick, easy, and inexpensive.
STEP 5
ADD DEHUMIDIFIERS
I bought two 70-pint GE dehumidifiers at Home Depot for $275 each. My Electric company gave me a $75 rebate on each since they are Energy-Star certified, so the net cost was about $450 or so including tax. These dehumidifiers have a defrost circuit (mandatory) and a pump that will automatically send the collected water outside of your crawl space up to 16 feet.
Why use two? Well, at about 1800 square feet, once would have been adequate, according to the information on the box. However, my crawl space has 3 divider walls, so circulation is very poor. I did in fact initially just install one unit, but the other end of the crawl space did not get dry enough.
I placed them at either end of the crawl space where I could get to them pretty easily through an access door, with a fan in the center as well as the humidity sensor. They do have circulating fans, so will eventually condition all of the air in your crawl, but it helps to add the fan.
Another consideration was where to place the small discharge tube for the water. Obviously it needs to be routed outside of the house so the water is pumped away from the crawl space. At one end, I made a small opening in the door frame to accommodate the tube. At the other end, I ended up drilling through a cinder block using a long concrete bit. Keep in mind that you will want to pull these tubes inside for the winter (after shutting the dehumidifiers off).
I set mine at 45% relative humidity based on the recommendations of the crawl space encapsulation companies I talked to. I was told to watch any wood floors in the house and see if they separate due to the dryness, and yes, I do see some separation. However, I plan to replace that floor. You might want to start at a higher number, such as 55%, if you have wood floors you are concerned about.
STEP 6
WINTERIZE EACH SEASON
Below 41F degrees, the coils on my dehumidifiers will freeze. Also, the plastic discharge lines routed outside the crawl space can freeze if water remains in them, leading to splitting, or worse yet, water backing up into the crawl space.
If you live in a cold climate, you unfortunately need to shut down the dehumidifiers for the winter. Once you see outside temperatures getting around freezing, and/or the crawl space temperature approaching 41F, it’s time. Unplug them, as well as a circulation fan if you have one running. Don’t worry, humidity is typically low during the winter and your crawl space should stay dry. Empty and clean the water buckets on each dehumidifier, and pull the discharge hoses into the crawl.
Hook things back up in the spring once temperatures stay above freezing.
Winterization checklist:
Take brush, flashlight and phone/flashlight with me into crawl space.
Unplug dehumidifer(s) (don't use on/off switch) so it will retain your current settings.
Unplug circulation fan.
Remove and brush front grille of dehumidifiers.
Bring dehumidifier air filter and bucket inside for cleaning (warm soapy water). Store in garage.
Remove bucket filter and rinse it
Store these in garage, install in spring (avoids extra trip to the crawl space.
Plastic hoses seem to be OK leaving them out in the cold for the winter.
Summerization checklist:
Replace air filter and bucket on dehumidifiers.
Plug dehumidifiers back in.
Make sure Pump light comes on.
Make sure still set to 45%.
Monitor humidity levels (Abode sensor) for a couple of weeks to make sure everything working OK.